Introduction
Converting images to embroidery files is an essential skill for anyone involved in embroidery design. However, the process can be fraught with pitfalls that can lead to poor-quality results. This article aims to highlight common mistakes and provide tips on how to avoid them before you convert image to embroidery file, ensuring your embroidery projects turn out beautifully.
Understanding the Basics of Embroidery File Conversion
What is Embroidery File Conversion?
Embroidery file conversion involves transforming a digital image into a format that can be read by an embroidery machine. This process is crucial because not all image files are compatible with embroidery software and machines.
Importance of Quality in Conversion
Quality is paramount in embroidery file conversion. A poorly converted file can result in jagged lines, misplaced stitches, and a generally unprofessional look. Ensuring high-quality conversion is key to achieving a polished final product.
Essential Tools for Conversion
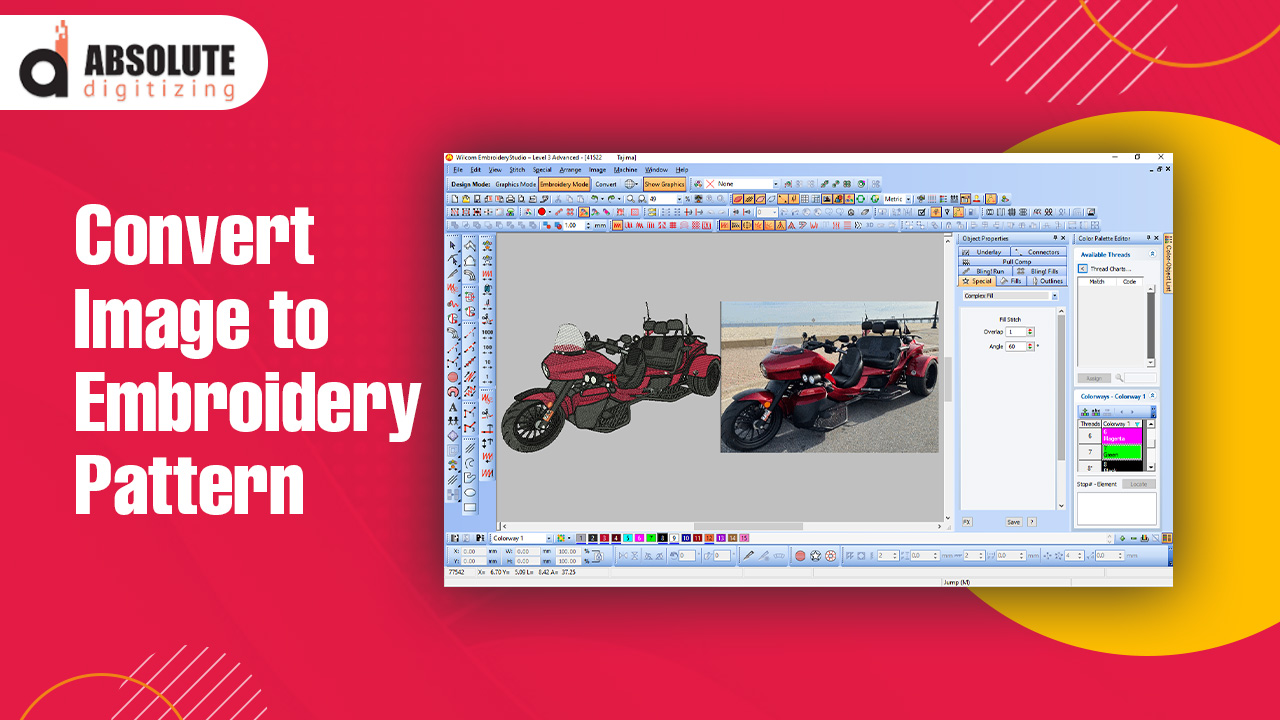
Several tools are available for converting images to embroidery files, including software like Wilcom, Hatch, and Brother’s PE-Design. Choosing the right tool can make a significant difference in the quality of your conversions.
Mistake 1: Using Low-Resolution Images
Why Resolution Matters
Using a low-resolution image is one of the most common mistakes. Embroidery machines require high-resolution images to produce clean, precise stitches. Low-resolution images can lead to pixelation and poor-quality designs.
How to Choose the Right Resolution
Ensure your images are at least 300 DPI (dots per inch). Higher resolutions provide more detail and result in better embroidery quality.
Examples of Good and Bad Resolutions
Comparing different resolutions, a 72 DPI image versus a 300 DPI image, clearly shows the difference in detail and clarity, emphasizing the importance of high-resolution images.
Mistake 2: Ignoring Image Complexity
Understanding Image Complexity
Highly complex images with intricate details can be challenging to convert accurately. Embroidery machines have limitations in replicating tiny details, which can result in a loss of clarity and quality.
Simplifying Your Image
Simplify your images before conversion. Reduce the number of colors and eliminate unnecessary details. This simplification helps in achieving a more accurate and aesthetically pleasing embroidery design.
Tools for Simplifying Images
Use image editing software like Adobe Illustrator or CorelDRAW to simplify your images. These tools allow you to adjust color palettes and remove complex details efficiently.
Mistake 3: Choosing Inappropriate Colors
Importance of Color Selection
Choosing the wrong colors can significantly impact the final embroidery design. Embroidery threads have a limited color range compared to digital images, making it crucial to select colors that can be accurately reproduced.
Matching Thread Colors
Match your digital image colors to available thread colors. Use thread manufacturer color charts to ensure accurate color representation in your embroidery designs.
Tools for Color Matching
Software like Wilcom and Hatch offer color matching tools that help you align your digital colors with actual thread colors, ensuring consistency in your designs.
Mistake 4: Neglecting Stitch Density
What is Stitch Density?
Stitch density refers to the number of stitches in a given area of your design. Proper stitch density is crucial for ensuring your design looks crisp and detailed.
Effects of Incorrect Stitch Density
Too high stitch density can lead to thread breakage and puckering, while too low density can result in a sparse, unfinished look. Finding the right balance is key.
Adjusting Stitch Density
Most embroidery software allows you to adjust stitch density. Experiment with different settings to find the optimal density for your design, balancing durability and aesthetics.
Mistake 5: Overlooking Underlay Stitches
Role of Underlay Stitches
Underlay stitches are the foundation of your embroidery design. They provide stability and support for the top stitches, preventing distortion and ensuring a smooth, professional finish.
Common Underlay Mistakes
Skipping underlay stitches or using incorrect types can lead to design distortion and poor quality. Each fabric type may require different underlay techniques.
Best Practices for Underlay Stitches
Use appropriate underlay settings for your fabric and design. Adjust underlay types (e.g., edge run, zigzag) based on the specific requirements of your project for optimal results.
Mistake 6: Ignoring Fabric Type
Why Fabric Type Matters
Different fabrics react differently to embroidery. Ignoring the fabric type can lead to issues like puckering, distortion, or thread breakage.
Matching Design to Fabric
Choose designs and settings that are suitable for the fabric you are working with. For instance, stretchy fabrics require different stabilization techniques compared to rigid fabrics.
Testing on Fabric Swatches
Always test your design on a fabric swatch before embroidering the final product. This allows you to make necessary adjustments to ensure the best possible outcome.
Mistake 7: Skipping the Testing Phase
Importance of Testing
Skipping the testing phase is a critical mistake. Testing allows you to catch and correct issues before they affect your final product, saving time and materials.
Conducting Proper Tests
Run a test embroidery on a similar fabric to identify and fix any problems. Check for issues like thread tension, color accuracy, and stitch quality during the test phase.
Adjustments Based on Test Results
Use the results from your test runs to make necessary adjustments to your design, ensuring that the final product meets your quality standards.
Mistake 8: Incorrect Hoop Placement
Significance of Hoop Placement
Incorrect hoop placement can cause design misalignment and distortion. Proper hooping ensures that your design is centered and stitched accurately.
Techniques for Proper Hooping
Learn and practice proper hooping techniques. Use alignment tools and markers to ensure that your fabric is hooped correctly and securely.
Common Hooping Tools
Hooping aids and alignment tools can help you achieve precise placement. Consider investing in tools that make the hooping process easier and more accurate.
Mistake 9: Overcomplicating the Design
Keeping Designs Simple
Overcomplicating designs with excessive details can lead to poor-quality results. Simple, clean designs often translate better into embroidery.
Benefits of Simplified Designs
Simplified designs are easier to digitize and produce more consistent results. They also reduce the risk of errors and make the embroidery process smoother.
Examples of Effective Simple Designs
Review examples of simple yet effective designs to understand how to create clean, impactful embroidery patterns that translate well from digital images.
Mistake 10: Not Seeking Professional Help
Value of Professional Digitizing Services
Sometimes, the best approach is to seek professional help. Professional digitizing services have the expertise and tools to ensure high-quality conversions.
When to Seek Professional Help
If you’re struggling with the conversion process or need a high-quality result for a critical project, consider hiring a professional digitizer.
Finding Reliable Digitizing Services
Look for reputable digitizing services with positive reviews and a portfolio of successful projects. Ensure they offer the support and quality you need for your embroidery projects.
Conclusion
Converting images to embroidery files is a nuanced process that requires attention to detail and a thorough understanding of the tools and techniques involved. By avoiding common mistakes such as using low-resolution images, ignoring fabric types, and skipping the testing phase, you can significantly improve the quality of your embroidery projects. Whether you choose to digitize your designs yourself or seek professional help from Absolute Digitizing, following these guidelines will help you achieve the best possible results for your embroidery work.